
Collect form responses using Google Apps Script in Jekyll website
We can use Google Apps Script to collect form responses on a static website and get notified on Slack, all without setting a server.


This blog was originally published on RavSam blog.
Most of the time we are designing static websites. But almost all of them have some components like forms, comments, where we want to collect the user responses. Setting up a dedicated server for the backend and database is a good option, but there is a cost overhead as well. Thankfully, we can set up this entire system using a serverless architecture.
In this blog, we will talk about how can we use amazing Google Apps Scripts as backend and Google Spreadsheets for data persistence to collect the form responses from our static website. This approach can help you set up forms on Github Pages, Netlify, or any other hosting provider. As a bonus, we will also add a webhook to notify our Leads team on Slack whenever a new form is filled.
Creating a Google Spreadsheet
Create a new Google Spreadsheet and name the sheet as Sheet1.
Add the following fields in the top row of your spreadsheet. Make sure you name them correctly because we will be using these names in our HTML form.
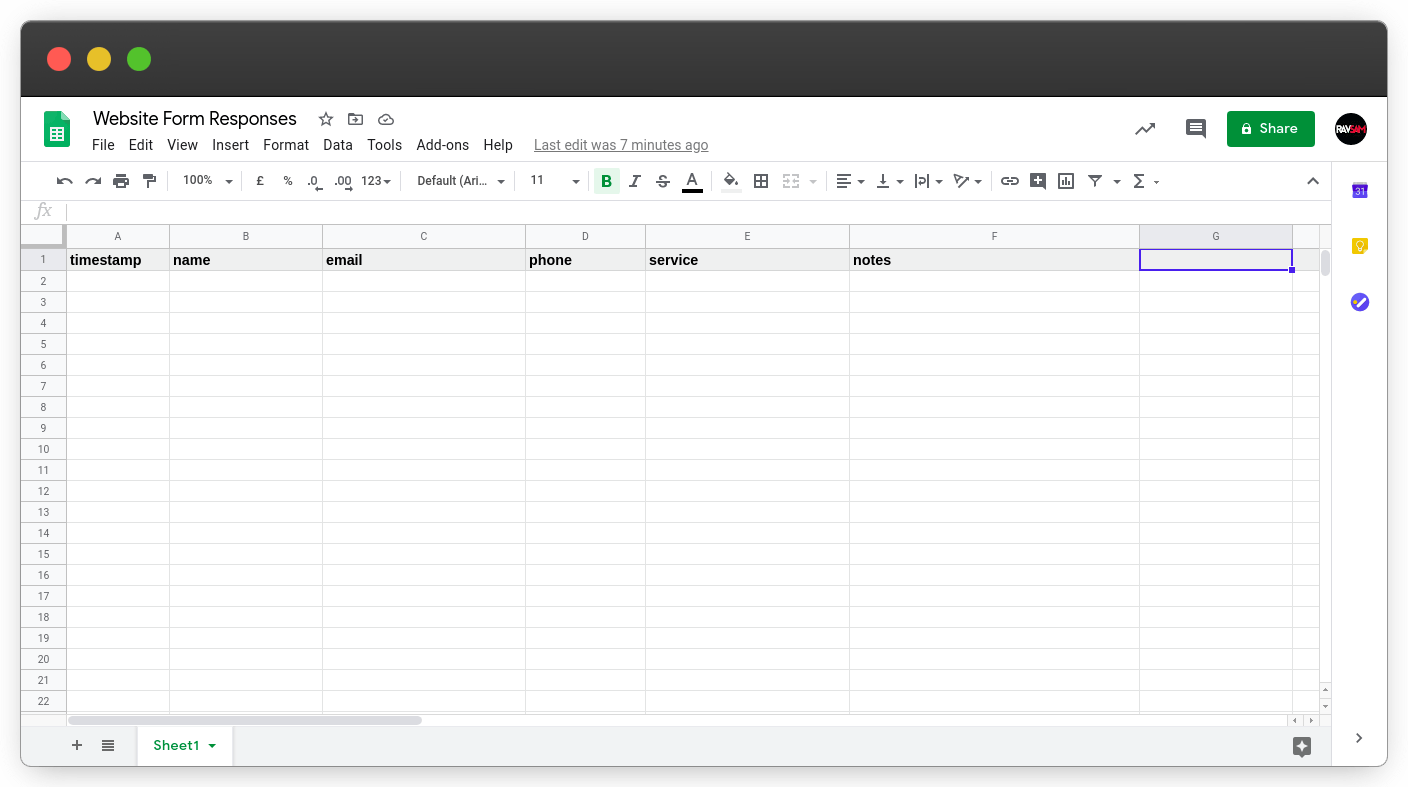 Google Spreadsheet to collect form responses
Creating a Slack Bot
To notify our Leads team on Slack, we need to create a Slack bot. Setting up a Slack bot is pretty easy.
Go to https://api.slack.com/apps and click
Create New App.We will give our app a name and choose our
Development Workspacefrom the dropdown.Once we have created an app, we need to turn on the
Incoming Webhookfeature and create a new webhook URL.We will create a new webhook by clicking
Add New Webhook to Workspaceand choose the channel we want the notifications to be posted in. Your webhook URL should look like thishttps://hooks.slack.com/services/T0160Uxxxxx/B0187Nxxxxx/4AZixxswHVxxxxxxxxxxxxxx. If you have access to a terminal, you can test the webhook as well by sending a POST request using cURL.
curl -X POST -H 'Content-type: application/json' --data '{"text":"Hello, World!"}' https://hooks.slack.com/services/T0160Uxxxxx/B0187Nxxxxx/4AZixxswHVxxxxxxxxxxxxxx
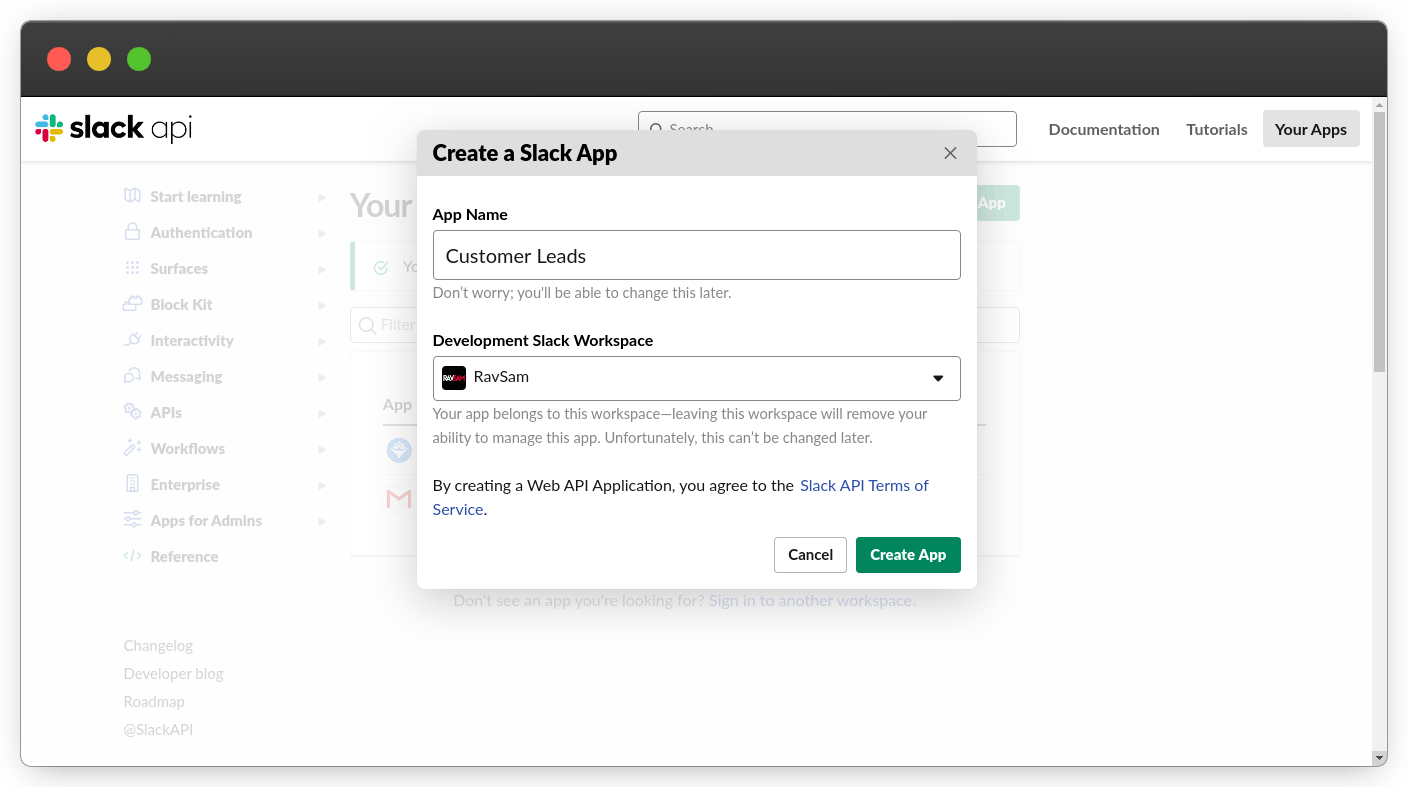 Setup name of your Slack app and development workspace
Creating a Google Apps Script Project
Now comes the most important and interesting part of the project. Google Apps Script is written in Javascript. So even if you have basic Javascript knowledge, setting up Google Apps will be a breeze for you.
We will create a new project at https://script.google.com/home.
We will create a new script file from File > New > Script and name it as Form.gs
Add the following code to this script file:
// new property service
var SCRIPT_PROP = PropertiesService.getScriptProperties();

function doGet(e) {
  return handleResponse(e);
}

function handleResponse(e) {
  // this prevents concurrent access overwritting data
  // we want a public lock, one that locks for all invocations
  var lock = LockService.getPublicLock();
  lock.waitLock(30000);  // wait 30 seconds before conceding defeat

  try {
    // next set where we write the data - you could write to multiple/alternate destinations
    var doc = SpreadsheetApp.openById(SCRIPT_PROP.getProperty("key"));
    var sheet = doc.getSheetByName(SHEET_NAME);

    var headRow = 1;
    var headers = sheet.getRange(1, 1, 1, sheet.getLastColumn()).getValues()[0];
    var nextRow = sheet.getLastRow() + 1; // get next row
    var row = [];

    // loop through the header columns
    for (i in headers) {
      switch (headers[i]) {
        case "timestamp":
          row.push(new Date());
          break;
        default:
          var str = e.parameter[headers[i]];
          row.push(str.trim().substring(0, CHARACTER_LIMIT));
          break;
      }
    }

    // add data to the spreadsheet
    sheet.getRange(nextRow, 1, 1, row.length).setValues([row]);

    // send thanks email to customer
    var emailStatus = notifyCustomer(row);

    // send notification to slack
    postToSlack(row, emailStatus);

    // return json success results
    return ContentService
          .createTextOutput(JSON.stringify({"result": "success"}))
          .setMimeType(ContentService.MimeType.JSON);
  }
  catch (e) {
    // if error then log it and return response
    Logger.log(e);
    return ContentService
          .createTextOutput(JSON.stringify({"result": "error"}))
          .setMimeType(ContentService.MimeType.JSON);
  }
  finally {
    // release lock
    lock.releaseLock();
  }
}

function setup() {
    var doc = SpreadsheetApp.getActiveSpreadsheet();
    SCRIPT_PROP.setProperty("key", doc.getId());
}
Don’t forget to run the setup function. It is important to connect your project with the Google Spreadsheet and gain the right permissions.
We will again create a new script file from File > New > Script and name it as Email.gs
In this file, we will write the code that sends an email back to the customer on our behalf.
Add the following code to this script file:
function notifyCustomer(data) {
  var name = data[1];
  var message = "Hi" + name + ". Your response has been received. We will get in touch with you shortly.";

  // check if we can send an email
  if (MailApp.getRemainingDailyQuota() > 0) {
    var email = data[2];

    // send the email on our behalf
    MailApp.sendEmail({
      to: email,
      subject: "Thanks for contacting RavSam",
      body: message
    });

    return true;
  }
}
We will again create a new script file from File > New > Script and name it as Slack.gs
In this file, we will write the code that notifies our Leads team of the form submission.
Add the following code to this script file:
function postToSlack(data, emailSent) {
  var name = data[1];
  var email = data[2];
  var phone = data[3];
  var service = data[4];
  var notes = data[5];

  // check if email was sent
  if (emailSent) var emailStatus = 'Email Sent';
  else var emailStatus = 'Email Not Sent';

  // create a message format
  var payload = {
    "attachments": [{
        "text": "Lead Details",
        "fallback": "New Customer Lead has been received",
        "pretext": "New Customer Lead has been received",
        "fields": [
          {
            "title": "Full Name",
            "value": name,
            "short": true
          },
          {
            "title": "Phone",
            "value": "<tel:" + phone + "|" + phone + ">",
            "short": true
          },
          {
            "title": "Service",
            "value": service,
            "short": true
          }
          {
            "title": "Email",
            "value": emailStatus + " to <mailto:" + email + "|" + email + ">",
            "short": false
          },
          {
            "title": "Notes",
            "value": notes,
            "short": false
          },
        ],
        "mrkdwn_in": ["text", "fields"],
        "footer": "Developed by <https://www.ravsam.in|RavSam>",
    }]
  }

  // prepare the data to be sent with POST request
  var options = {
    "method" : "post",
    "contentType" : "application/json",
    "payload" : JSON.stringify(payload)
  };

  // send a post request to our webhook URL
  return UrlFetchApp.fetch(webhookUrl, options)
}
Finally, we will create a script file from File > New > Script and name it as Variables.gs to store our constant variables.
In this file, we will store our constant variables that are referenced in the project.
Add the following code to this script file:
//  enter sheet name where data is to be written below
var SHEET_NAME = 'Sheet1';

// set a max character limit for each form field
var CHARACTER_LIMIT = 1000;

// slack bot weebhook URL
var webhookUrl = 'https://hooks.slack.com/services/T0160Uxxxxx/B0187Nxxxxx/4AZixxswHVxxxxxxxxxxxxxx';
So our project is ready, but there is still one last thing to do. We need to deploy our project as a Web App so that we can access it through our website’s Javascript code.
Deploying a Google Apps Script Project
We are done with the code and now is the deploy our project as a Web App.
We will create a script file from Publish > Deploy as Web App…
Make sure you set the Who has access to the app: to Anyone, even anonymous. This is important so that we can make an unauthorized call to our Web App.
Finally, deploy the web app and copy the web app’s URL. The URL looks like this
[https://script.google.com/macros/s/AKfycbxSF9Y4V4qmZLxUbcaMB0Xhmjwqxxxxxxxxxxxxxxxxxxxxxxx/exec](script.google.com/macros/s/AKfycbxSF9Y4V4qm..)
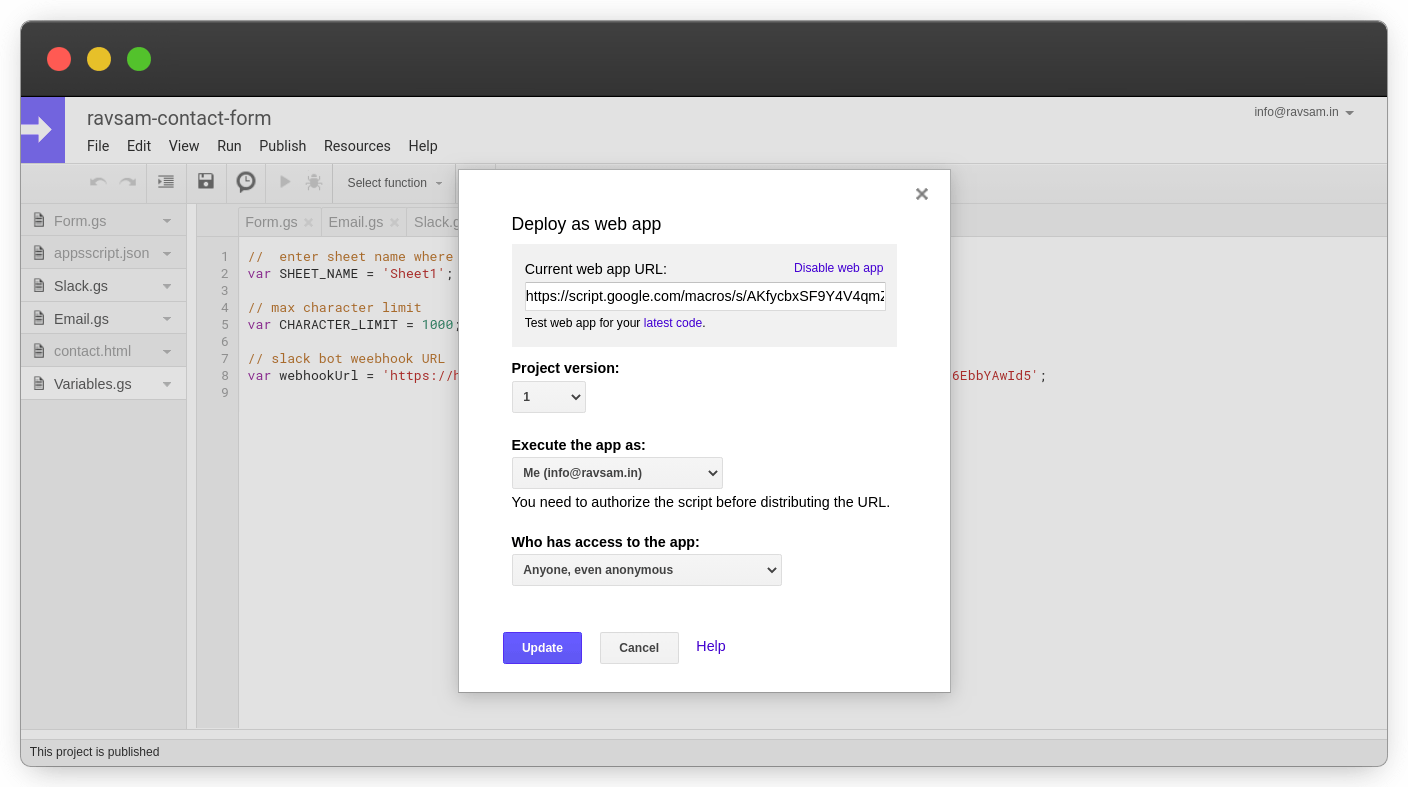 Deploy the Google Apps Script project as a web app
Setting up an HTML form
On our Jekyll website, add the following Bootstrap form:
<form id="contact-form" class="needs-validation" role="form" novalidate>
<div class="row">
<div class="col-md-6">
<div class="form-group">
<input type="text" name="name" class="form-control" placeholder="Full Name" required>
</div>
</div>
<div class="col-md-6">
<div class="form-group">
<input type="email" name="email" class="form-control" placeholder="Email" required>
</div>
</div>
<div class="col-md-6">
<div class="form-group">
<input type="tel" name="phone" class="form-control" placeholder="Mobile No." required>
</div>
</div>
<div class="col-md-6">
<div class="form-group">
<input type="text" name="service" class="form-control" placeholder="Service" required>
</div>
</div>
<div class="col-12">
<div class="form-group">
<textarea class="form-control rounded" rows="8" name="notes" placeholder="Any Notes" required></textarea>
</div>
</div>
<div class="col-12 mt-3">
<button class="btn btn-primary" type="submit" name="submit">Submit request -></button>
</div>
</div>
</form>
We need to make sure that the form fields’ names are the same as headers in the Google Spreadsheet.
Setting up Javascript
Finally, we need to add some Javascript to make AJAX call to the Google Apps Script:
<script src="https://www.ravsam.in/assets/jquery/dist/jquery.min.js"></script>
<script src="https://www.ravsam.in/assets/popper.js/dist/umd/popper.min.js"></script>
<script src="https://www.ravsam.in/assets/bootstrap/dist/js/bootstrap.min.js"></script>
<script>
// for validating the forms
(function () {
'use strict';
window.addEventListener(
'load', function () {
var formObject = $('#contact-form');
var form = formObject[0];
if (form != undefined) {
form.addEventListener(
'submit',
function (event) {
var submitBtn = $('button[name="submit"]')[0];
submitBtn.disabled = true;
submitBtn.innerHTML = 'Submitting request...';
if (form.checkValidity() === false) {
submitBtn.disabled = false;
submitBtn.innerHTML = 'Submit request ->';
event.preventDefault();
event.stopPropagation();
}
else {
var url = 'https://script.google.com/macros/s/AKfycbxSF9Y4V4qmZLxUbcaMB0Xhmjwqxxxxxxxxxxxxxxxxxxxxxxx/exec';
var redirectSuccessUrl = '/thanks/';
var redirectFailedUrl = '/failed/';
var xhr = $.ajax({
url: url,
method: 'GET',
dataType: 'json',
data: formObject.serialize(),
success: function (data) {
submitBtn.disabled = false;
submitBtn.innerHTML = 'Submit request ->';
$(location).attr('href', redirectSuccessUrl);
},
error: function (data) {
submitBtn.disabled = false;
submitBtn.innerHTML = 'Submit request ->';
$(location).attr('href', redirectFailedUrl);
},
});
event.preventDefault();
event.stopPropagation();
}
form.classList.add('was-validated');
},
false
);
}
},
false
);
})();
</script>
If the form submission is successful, our customer will be redirected to the Thanks page. However, if anything goes wrong, our customer will be redirected to a Failed page.
Results
Let us fill the form on our Jekyll website. We will add all the required details and submit the form.
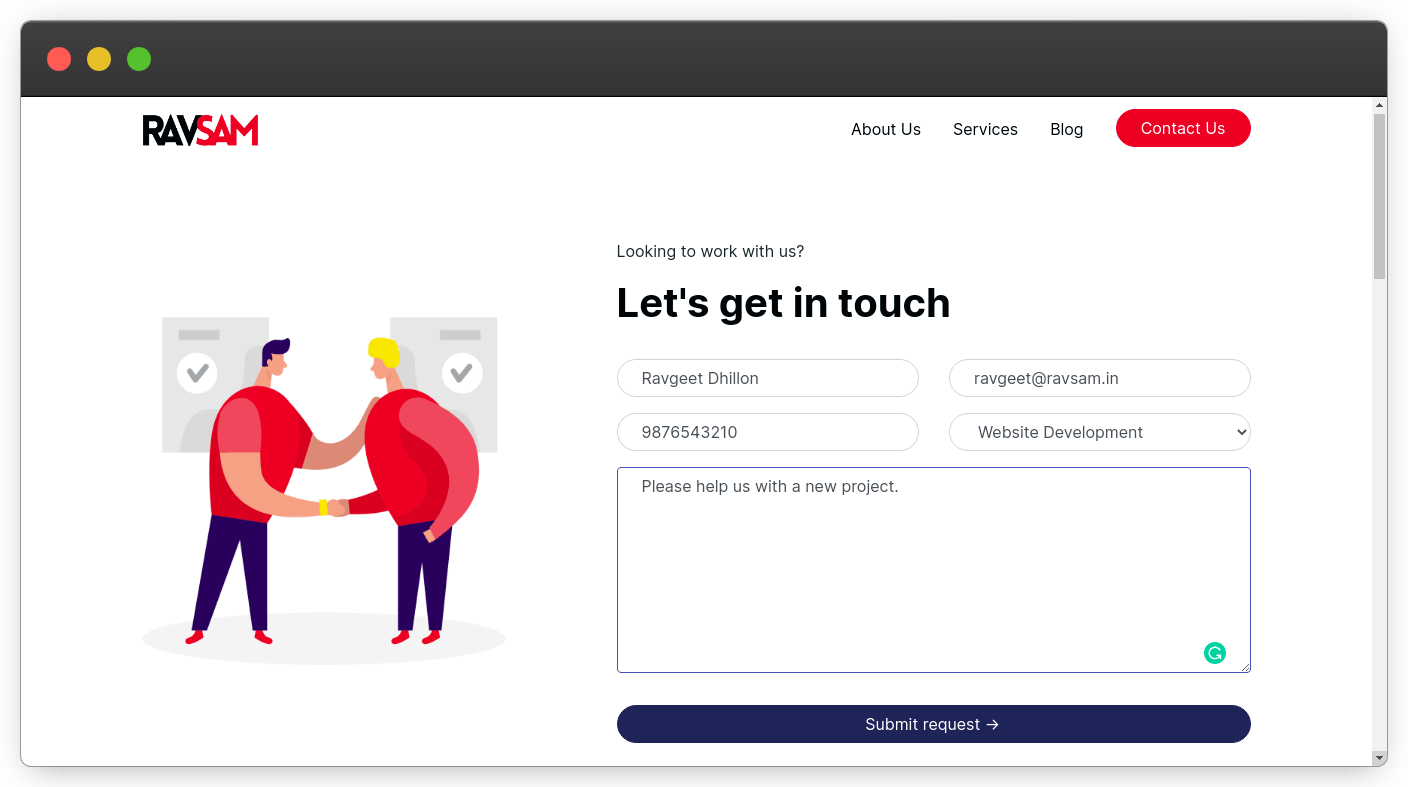 Fill out the website form
Hurray! We have received a notification sent by our Customer Leads bot.
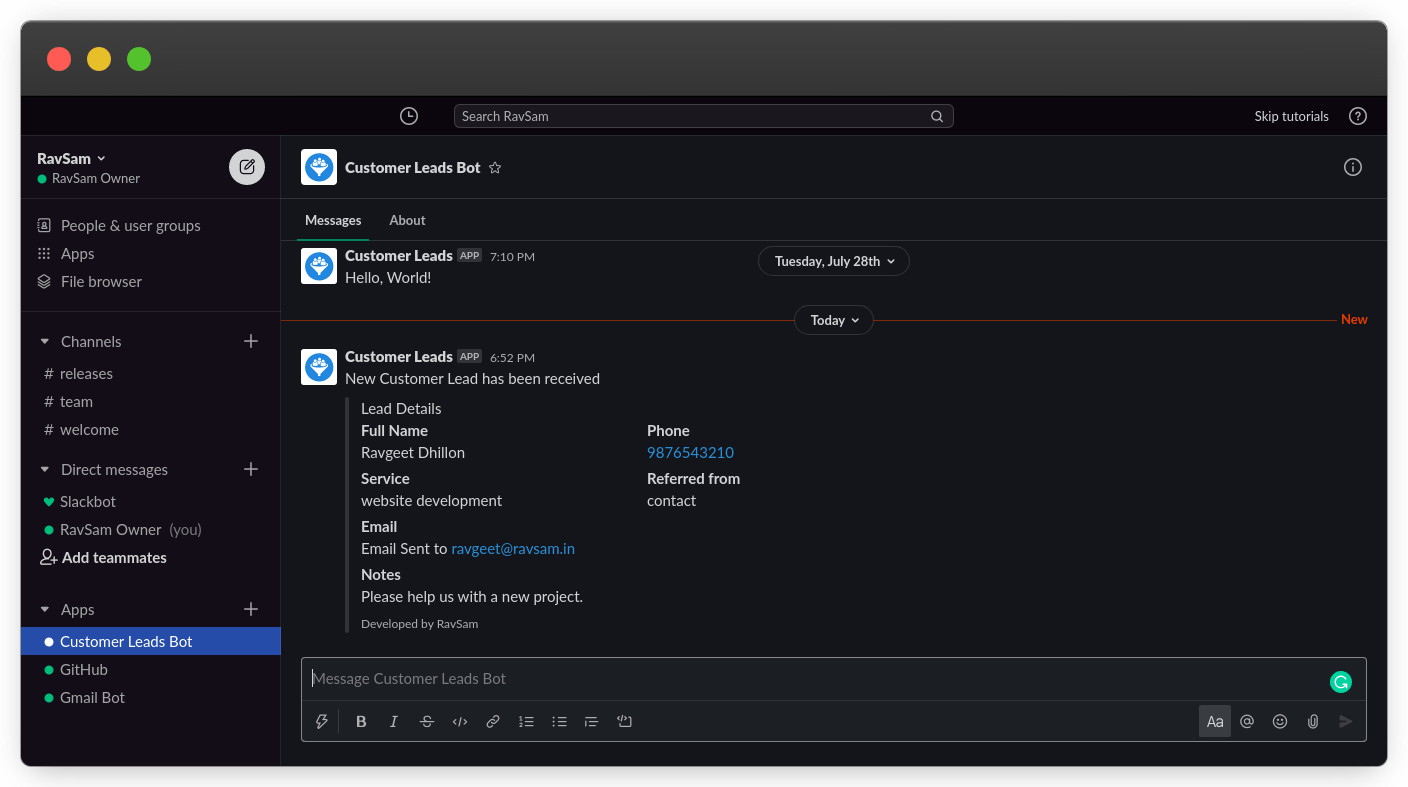 Notification received in the Slack channel
Let us check our Google Spreadsheet as well and see whether the form response was recorded or not. We can see in the screenshot below that the form response has been successfully stored in the spreadsheet.
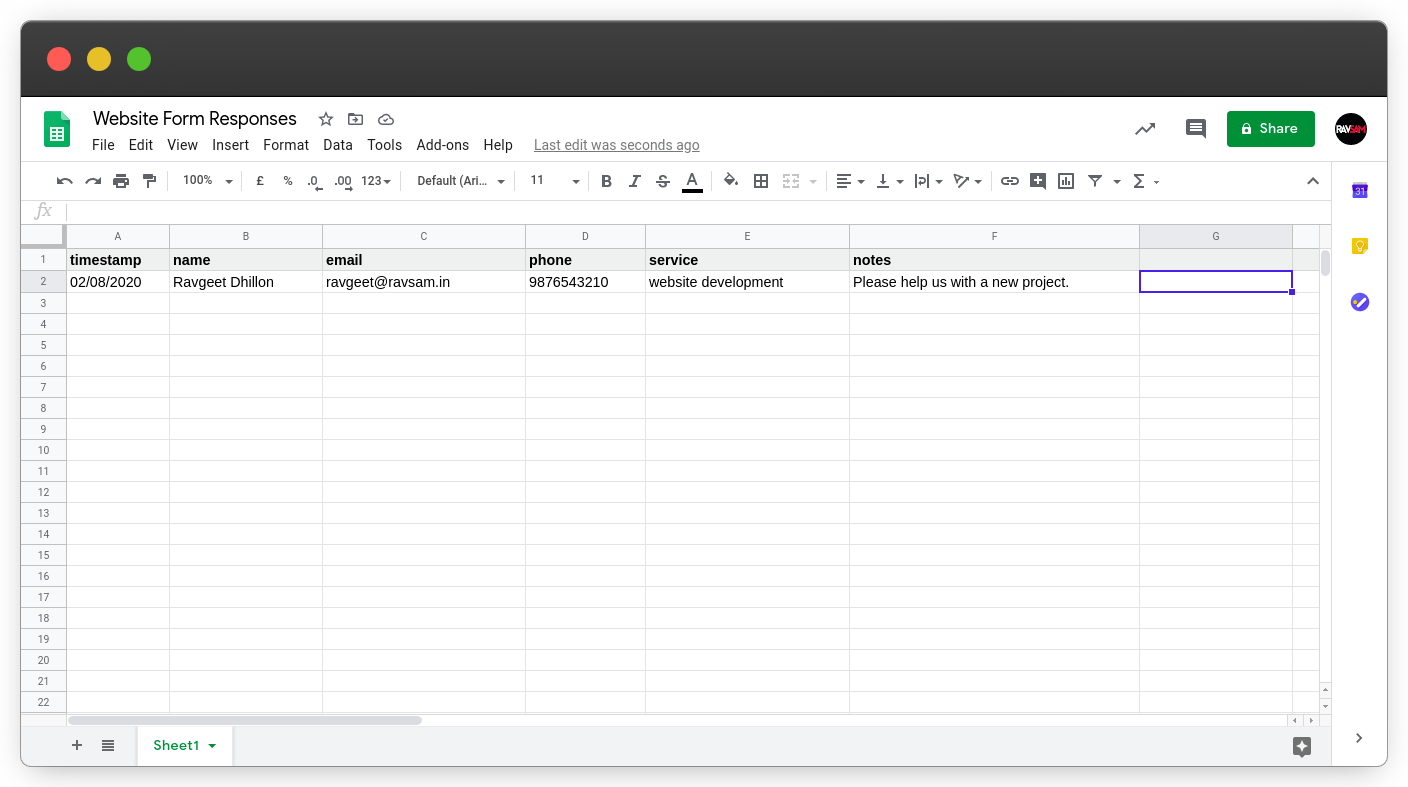 Form response recorded in Google Spreadsheet
Using this workflow, we can get in touch with our customers as soon as possible and convert the leads into happy clients. Moreover, there is no need to set up servers and databases for collecting form responses on your website. You can use the same approach to collect comments on your blog posts as well.
Thanks for reading 💜
If you enjoyed my blog, follow me for more informative content like this.
I publish a monthly newsletter in which I share personal stories, things that I am working on, what is happening in the world of tech, and some interesting dev related posts which I across while surfing on the web.
Connect with me through Twitter • LinkedIn • Github or send me an Email.
— Ravgeet, Full Stack Developer and Technical Content Writer